OpenCDA Tutorial
In this section, we will introduce the logic flow to construct a scenario and test the default/customized algoirhtms in OpenCDA.
Codebase Structure
Check the codebase structure to see how the codes distributed in OpenCDA.
Overview
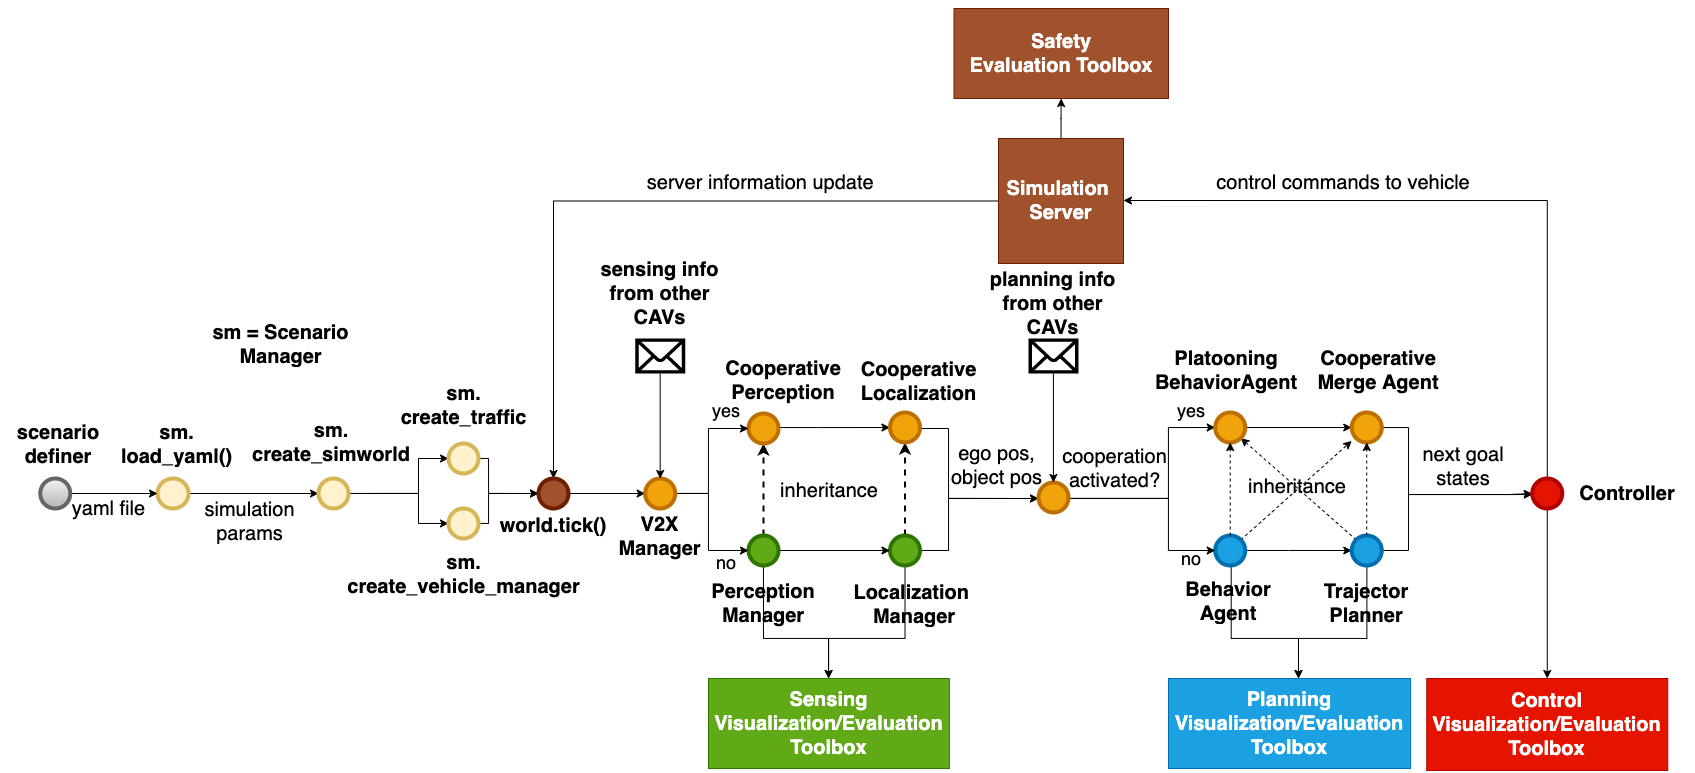
As the figure below depicts, to run simulation testings in OpenCDA, there are five general steps:
The user has to first write a yaml file to configure the settings of simulation server(e.g. sync mode vs async mode), the specifications of the traffic flow(e.g. the number of human drive vehicles, spawn positions,), and the parameters of each Connected Automated Vehicle(e.g. lidar parameters, detection model, trajectory smoothness).
The Scenario Manager will load the yaml file, and deliver the necessary information to CARLA server to set simulation setting, create traffic flow and generate the CAVs. Each CAV is managed by a class called
VehicleManager.The simulation server information will pass to each
VehicleManager. Based on whether the corresponding cooperative modules are activated, theVehicleManagerwill select different perception, localization, and planning modules to send the planned trajectory to theControlManager. The controller will produce control commands and deliver to the simulation server.The simulation server will apply the received control commands to the vehicles, execute a single step, and return the updated information to the
VehicleManagerfor next round running.After simulation is over,
EvaluaitonManagerwill evaluate different modules’ performance and save the statistics.
 teaser
Step1: Define the yaml file
Check the Yaml Define Rule to see how to write a yaml file to define your scenario.
Step2: Construct scenario
After the yaml file is given, the Scenario Manager will load the file
and construct the scenario through opencda sim_api and map_api.
import opencda.scenario_testing.utils.sim_api as sim_api
import opencda.scenario_testing.utils.customized_map_api as map_api
from opencda.scenario_testing.utils.yaml_utils import load_yaml
from opencda.scenario_testing.evaluations.evaluate_manager import \
    EvaluationManager

# Aad yaml file into a dictionary
scenario_params = load_yaml(config_yaml)
# Create CAV world object to store all CAV VehicleManager info.
# this is the key element to achieve cooperation
cav_world = CavWorld(opt.apply_ml)
# create scenario manager
scenario_manager = sim_api.ScenarioManager(scenario_params,
                                           opt.apply_ml,
                                           town='Town06',
                                           cav_world=cav_world)
# create a list of platoon
platoon_list = \
    scenario_manager.create_platoon_manager(
        map_helper=map_api.spawn_helper_2lanefree,
        data_dump=False)

# create a list of single CAV
single_cav_list = \
    scenario_manager.create_vehicle_manager(application=['single'])

# create background traffic under Carla
traffic_manager, bg_veh_list = \
    scenario_manager.create_traffic_carla()

# create the evaluation manager
eval_manager = \
    EvaluationManager(scenario_manager.cav_world,
                      script_name='platoon_joining_town06_carla',
                      current_time=scenario_params['current_time'])
As you can observe from the above scripts, only less than 10 lines of codes are needed to construct a complex scenario!
Step3: Execute a single step
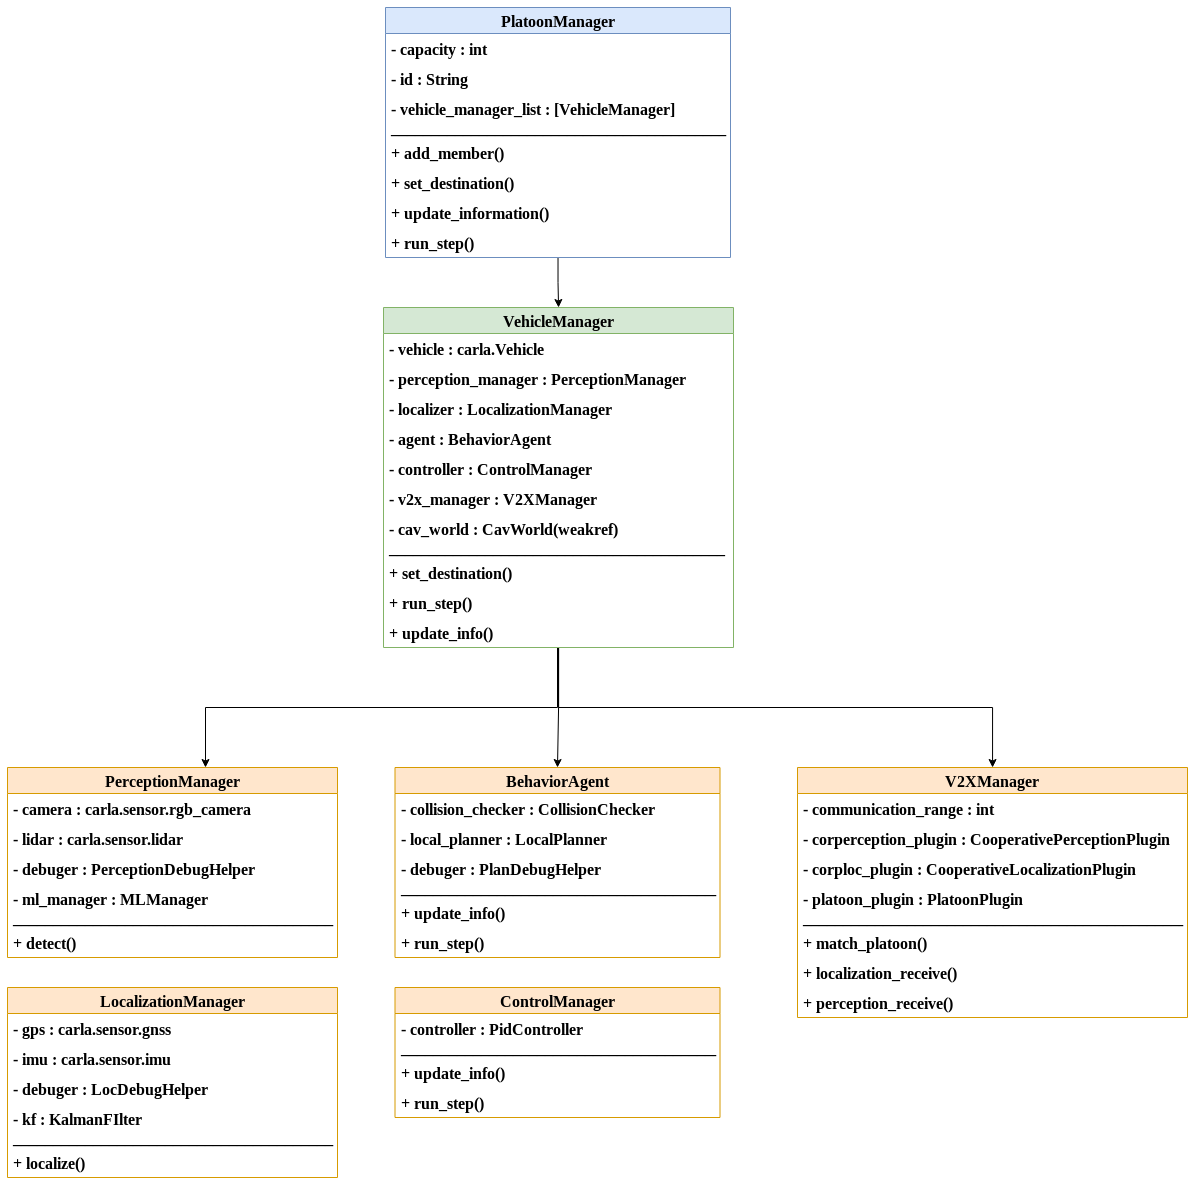
A simplified class diagram design is shown below.
The core class in OpenCDA is VehicleManager, which is the base class for any cooperative driving applications(e.g. PlatoonManager
is built upon VehicleManager ). It contains the necessary modules such as PerceptionManager and
LocalizationManager.
 teaser
Based on whether certain cooperative driving application is activated,
VehicleManager will choose different perception/localization/planning manager.
# vehicle_manager.py
class VehicleManager:
    def __init__(self, vehicle, config_yaml, application, carla_map, cav_world):
        if 'platooning' in application:
            platoon_config = config_yaml['platoon']
            self.agent = PlatooningBehaviorAgent(vehicle, self, self.v2x_manager,
                                                 behavior_config, platoon_config, carla_map)
        else:
            self.agent = BehaviorAgent(vehicle, carla_map, behavior_config)
During runtime, VehicleManager will first localize and detect the surrounding objects,
and then pass the computed information to v2x stack, planner and controller. Then the donwstream
modules will fuse information from different cavs, generate trajectory and control commands.
class VehicleManager:
        def update_info(self):
            # localization
            self.localizer.localize()
            ego_pos = self.localizer.get_ego_pos()
            ego_spd = self.localizer.get_ego_spd()

            # object detection
            objects = self.perception_manager.detect(ego_pos)

            self.v2x_manager.update_info(ego_pos, ego_spd)
            self.agent.update_information(ego_pos, ego_spd, objects)
            # pass position and speed info to controller
            self.controller.update_info(ego_pos, ego_spd)

        def run_step(self, target_speed=None):
            target_speed, target_pos = self.agent.run_step(target_speed)
            control = self.controller.run_step(target_speed, target_pos)
            return control
Step4: Keep the simulation loop running
while True:
    world.tick()
    single_cav.update_info()
    control = single_cav.run_step()
    single_cav.vehicle.apply_control(control)
Step5: Evaluation
When the simulation is over, the EvaluationManager will evaluate the performance,
and save the results in ~/OpenCDA/evluation_outputs
# create evaluation manager
eval_manager = EvaluationManager(cav_world)
eval_manager.evaluate()
Customize your own algorithms
Due the high modularity of OpenCDA, you can conveniently replace any default module with your own
algorithms. It is highly recommended to put your customized module under opencda/customize/.. and apply
inheritance to overwrite the default algorithm.
Here we show an example of customizing localzation module. The default localization selects Kalman Filter
as the fusing algorim, and we aim to use Extended Kalman Filter to replace it.
Under opencda/customize/core/sensing/localization, create localization_manager.py that inherit
the origin localization module and overrite the Kalman Filter with Extended Kalman Filter:
from opencda.core.sensing.localization.localization_manager import LocalizationManager
from opencda.customize.core.sensing.localization.extented_kalman_filter import ExtentedKalmanFilter

class CustomizedLocalizationManager(LocalizationManager):
    def __init__(self, vehicle, config_yaml, carla_map):
        super(CustomizedLocalizationManager, self).__init__(vehicle, config_yaml, carla_map)
        self.kf = ExtentedKalmanFilter(self.dt)
Then go to VehicleManager class, import this customized module and set it as the localizer.
from opencda.core.sensing.localization.localization_manager import LocalizationManager
from opencda.customize.core.sensing.localization.localization_manager import CustomizedLocalizationManager

class VehicleManager(object):
    def __init__(self, vehicle, config_yaml, application, carla_map, cav_world):
        # self.localizer = LocalizationManager(vehicle, sensing_config['localization'], carla_map)
        self.localizer = CustomizedLocalizationManager(vehicle, sensing_config['localization'], carla_map)
As long as you keep the input and output format as the origin imlementation, customization will be a very simple job.